I. GIỚI THIỆU
Trong bài này chúng ta sẽ sử dụng chức năng Database Readtime của firebase.
Dữ liệu lưu trên firebase thuộc dạng Json và được đồng bộ theo thời gian thực.
Hôm nay mình sẽ hướng dẫn các bạn cách lấy dữ liệu, cũng như parse dữ liệu trên firebase về máy.
Về kỹ thuật củ thể hoặc mở rộng các bạn xem tại đây.
II. NỘI DUNG
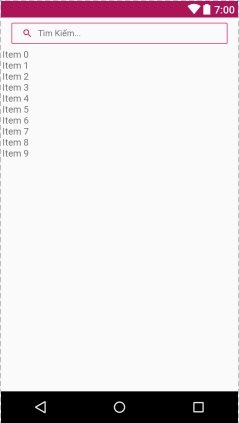
Xây dựng màn hình menu như sau:
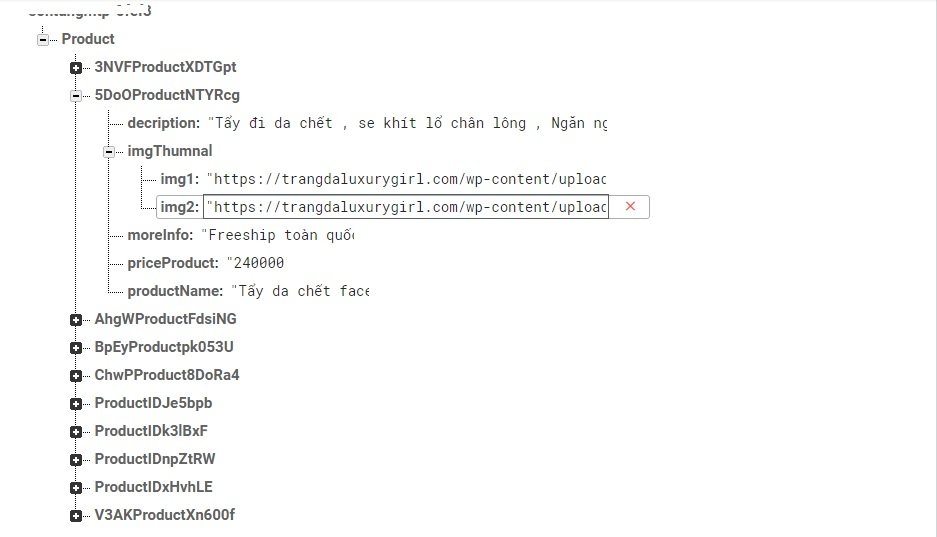
- Tạo dữ liệu mẫu trên firebase
- Tạo giao diện xml dưới android
- Code lấy dữ liệu hiển thị.
III. Thực Hiện
1.Đầu tiên mình sẽ tạo một số dữ liệu mẫu lên firebase như hình sau:
2. Tạo giao diện trên ứng dụng.
Trong phần này mình sẽ tạo thẳng trong MainActivity.java.
– activity_main.xml
<android.support.design.widget.CoordinatorLayout
   xmlns:android="http://schemas.android.com/apk/res/android"
    xmlns:tools="http://schemas.android.com/tools"
    android:layout_width="match_parent"
    android:layout_height="match_parent"
    xmlns:app="http://schemas.android.com/apk/res-auto"
    app:layout_behavior="@string/appbar_scrolling_view_behavior">
    <ScrollView
        android:layout_width="match_parent"
        android:layout_height="match_parent"
        android:scrollbars="none">

        <LinearLayout
            android:layout_width="match_parent"
            android:layout_height="wrap_content"
            android:orientation="vertical"
            android:paddingTop="@dimen/padding_below">

            <RelativeLayout
                android:id="@+id/llSearch"
                android:layout_width="match_parent"
                android:layout_height="wrap_content"
                android:descendantFocusability="beforeDescendants"
                android:focusableInTouchMode="true"
                android:paddingLeft="@dimen/activity_vertical_margin"
                android:paddingRight="@dimen/activity_vertical_margin">

                <LinearLayout
                    android:id="@+id/btn_search_home"
                    android:layout_width="match_parent"
                    android:layout_height="wrap_content"
                    android:layout_alignParentStart="true"
                    android:layout_centerInParent="true"
                    android:background="@drawable/background_border_padding"
                    android:clickable="true">

                    <ImageView
                        android:layout_width="@dimen/activity_horizontal_margin"
                        android:layout_height="@dimen/activity_horizontal_margin"
                        android:layout_gravity="center"
                        android:layout_marginEnd="@dimen/pad_8"
                        android:src="@drawable/ic_search"
                        android:tint="@color/home_color" />

                    <EditText
                        android:id="@+id/tv_search_home_content"
                        android:layout_width="match_parent"
                        android:layout_height="wrap_content"
                        android:layout_gravity="center"
                        android:background="@android:color/transparent"
                        android:hint="@string/search"
                        android:imeOptions="flagNoExtractUi"
                        android:maxLength="20"
                        android:singleLine="true"
                        android:textSize="@dimen/txt_13sp" />
                </LinearLayout>
            </RelativeLayout>

            <android.support.v7.widget.RecyclerView
                android:id="@+id/recyclerHome"
                android:layout_width="match_parent"
                android:layout_height="match_parent"
                android:layout_marginStart="@dimen/pad_1"
                android:paddingBottom="@dimen/pad_4"
                android:paddingTop="@dimen/padding_content"
                android:scrollbars="none" />
        </LinearLayout>

    </ScrollView>
</android.support.design.widget.CoordinatorLayout>
Tạo tiếp một file xml dùng làm item cho recyclerView ở trên.
-single_item_home.xml
<?xml version="1.0" encoding="utf-8"?>
<FrameLayout xmlns:android="http://schemas.android.com/apk/res/android"
    xmlns:tools="http://schemas.android.com/tools"
    android:layout_width="match_parent"
    android:layout_height="wrap_content"
    android:layout_marginBottom="1dp">

    <android.support.v7.widget.CardView
        xmlns:cardView="http://schemas.android.com/apk/res-auto"
        android:layout_width="match_parent"
        android:layout_height="wrap_content"
        android:clipToPadding="false"
        cardView:cardUseCompatPadding="true">

        <LinearLayout
            android:id="@+id/llPortfolioImage"
            android:layout_width="match_parent"
            android:layout_height="match_parent">

            <ImageView
                android:id="@+id/imgProduct"
                android:layout_width="match_parent"
                android:layout_height="match_parent" />
        </LinearLayout>

        <RelativeLayout
            android:id="@+id/productView"
            android:layout_width="match_parent"
            android:layout_height="match_parent">

            <TextView
                android:id="@+id/tvPriceProduct"
                android:layout_width="wrap_content"
                android:layout_height="wrap_content"
                android:layout_alignParentRight="true"
                android:layout_marginEnd="@dimen/pad_4"
                android:layout_marginStart="@dimen/pad_4"
                android:layout_marginTop="@dimen/pad_4"
                android:background="@drawable/background_top_right"
                android:text="Price"
                android:textColor="@color/home_color"
                android:textSize="@dimen/txt_12sp" />


            <TextView
                android:id="@+id/tvDetail"
                android:layout_width="wrap_content"
                android:layout_height="wrap_content"
                android:layout_alignParentBottom="true"
                android:layout_centerHorizontal="true"
                android:layout_marginBottom="@dimen/pad_4"
                android:layout_marginTop="@dimen/pad_4"
                android:background="@drawable/background_curve_solid_item"
                android:gravity="center_vertical"
                android:paddingBottom="@dimen/pad_2"
                android:paddingLeft="@dimen/pad_8"
                android:paddingRight="@dimen/pad_8"
                android:paddingTop="@dimen/pad_2"
                android:text="Chi Tiết"
                android:textAlignment="center"
                android:textColor="@color/home_color"
                android:textSize="@dimen/txt_13sp" />

        </RelativeLayout>
    </android.support.v7.widget.CardView>
</FrameLayout>
3. Tạo một model Products.java
public class Products implements Serializable{

    private String productKey;
    private String productName;
    private String priceProduct;
    private String moreInfo;
    private String decription;
    private HashMap<String,String> imgThumnal;
    private String number;
    private String status;
    // Please add Contructor
    //Getter // Setter
}
-Tạo HomeService.java
Class này có tác dụng lấy và parse dữ liệu thành một list sản phẩm.
public class HomeService extends BaseFireBase {
    private DatabaseReference mDatabase;

    public HomeService() {
        this.mDatabase = getDatabaseReference();
    }

    public void getAllProductInFirebase (final HomeListener listener) {
        final ArrayList<Products> list = new ArrayList<>();
        mDatabase.child("Product")
                .orderByChild("priceProduct")
                .addListenerForSingleValueEvent(new ValueEventListener() {
                    @Override
                    public void onDataChange(DataSnapshot dataSnapshot) {
                        //Parse dataSnapshot
                        for (DataSnapshot ds : dataSnapshot.getChildren()) {
                            Products products = ds.getValue(Products.class);
                            products.setProductKey(ds.getKey());
                            if (products.getStatus() == null) {
                                list.add(products);
                            }
                        }
                        listener.getAllProductSuccess(list);

                    }

                    @Override
                    public void onCancelled(DatabaseError databaseError) {
                        listener.getProductFailure(databaseError.toException());
                    }
                });

    }
}
–HomeListener.java dùng để nhận dữ liệu.
public interface HomeListener {
    void getAllProductSuccess(ArrayList<Products> productList);
    void getProductFailure(Exception ex);
}
-Tiếp theo để hiện thị dữ liệu lên RecyclerView chúng ta cần tạo một adapter có tên là:
ProductAdapter.java recyclerView bạn nào đã làm việc với thì công việc này sẽ đơn giản như sau:
public class ProductAdapter extends RecyclerView.Adapter<ProductAdapter.ProductHolder> {

    private ArrayList<Products> listProduct;
    private Activity activity;

    public ProductAdapter(ArrayList<Products> listProduct, Activity activity) {
        this.listProduct = listProduct;
        this.activity = activity;
    }

    @Override
    public ProductHolder onCreateViewHolder(ViewGroup parent, int viewType) {
        View view = LayoutInflater.from(parent.getContext()).inflate(R.layout.single_item_home, parent, false);
        return new ProductHolder(view);
    }

    @Override
    public void onBindViewHolder(ProductHolder holder, int position) {
        final Products products = listProduct.get(position);
        holder.tvPriceProduct.setText(Utils.formatNumberToMoney(Long.valueOf(products.getPriceProduct())) + " đ");
        HashMap<String, String> hashMap = products.getImgThumnal();
        Map.Entry<String, String> entry = hashMap.entrySet().iterator().next();
        String value = entry.getValue();
        Glide.with(activity).load(value)
                .asBitmap()
                .atMost()
                .diskCacheStrategy(DiskCacheStrategy.ALL)
                .override(300, 300)
                .centerCrop()
                .approximate()
                .into(holder.imgProduct);


    }

    @Override
    public int getItemCount() {
        return listProduct.size();
    }


    class ProductHolder extends RecyclerView.ViewHolder {
        TextView tvDetail;
        TextView tvPriceProduct;
        ImageView imgProduct;

        ProductHolder(View itemView) {
            super(itemView);
            tvDetail = (TextView) itemView.findViewById(R.id.tvDetail);
            tvPriceProduct = (TextView) itemView.findViewById(R.id.tvPriceProduct);
            imgProduct = (ImageView) itemView.findViewById(R.id.imgProduct);
            int imageWidth = initializeGridLayout();
            imgProduct.setLayoutParams(new LinearLayout.LayoutParams(imageWidth, imageWidth * 16 / 15));
        }
    }

    private int initializeGridLayout() {
        float padding = TypedValue.applyDimension(TypedValue.COMPLEX_UNIT_DIP,
                1, activity.getResources().getDisplayMetrics());
        return (int) ((Utils.getScreenWidth(activity) - ((3 + 1) * padding)) / 3);

    }
}
Các hàm bổ trợ: Chuyển đội định dạng tiền, lấy kích thước màn hình:
 public static int getScreenWidth(Context context) {
        WindowManager wm = (WindowManager) context
                .getSystemService(Context.WINDOW_SERVICE);

        DisplayMetrics displaymetrics = new DisplayMetrics();
        wm.getDefaultDisplay().getMetrics(displaymetrics);

        int screenWidth = displaymetrics.widthPixels;

        return screenWidth;
    }

    //Convert long to money type
    public static String formatNumberToMoney(long number) {
        if (number < 1000) {
            return String.valueOf(number);
        }
        try {
            NumberFormat formatter = new DecimalFormat("###,###");
            String resp = formatter.format(number);
            resp = resp.replaceAll(",", ".");
            return resp;
        } catch (Exception e) {
            return "";
        }
    }
-Cuối cùng quay lại MainActivity để gọi hàm hiển thị dữ liệu:
public class MainActivity extends AppCompatActivity {
    @BindView(R.id.recyclerHome)
    RecyclerView recyclerHome;
    private HomeService homeService;
    private ProductAdapter productAdapter;
    @Override
    protected void onCreate(Bundle savedInstanceState) {
        super.onCreate(savedInstanceState);
        setContentView(R.layout.activity_main);
        ButterKnife.bind(this);
        ConfigRecyclerView(recyclerHome);
        homeService = new HomeService();
        getAllProduct();
    }

    /**
     * Lấy Danh Sách sản phẩm
     */
    private void getAllProduct() {
        homeService.getAllProductInFirebase(new HomeListener() {
            @Override
            public void getAllProductSuccess(ArrayList<Products> productList) {
                productAdapter = new ProductAdapter(productList,MainActivity.this);
                recyclerHome.setAdapter(productAdapter);
                productAdapter.notifyDataSetChanged();
            }

            @Override
            public void getProductFailure(Exception ex) {

            }
        });
    }

    public void ConfigRecyclerView(RecyclerView view) {
        RecyclerView.LayoutManager manager = new GridLayoutManager(this,3);
        view.setHasFixedSize(true);
        view.setItemAnimator(new DefaultItemAnimator());
        view.setLayoutManager(manager);
    }

}
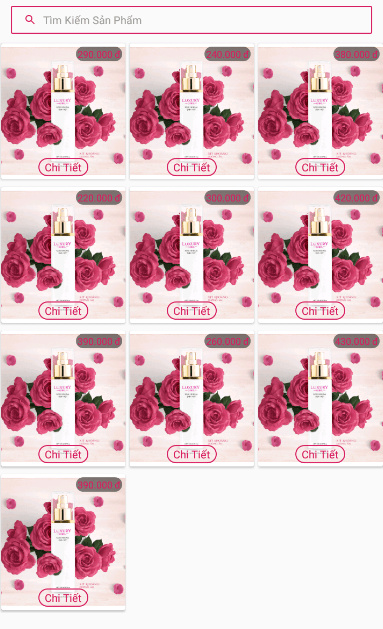
Chạy ứng dụng:
Ở bài viết tiếp theo mình, sẽ hướng dẫn nhanh các bạn , cách tạo 1 sản phẩm kèm hình ảnh mô tả.


