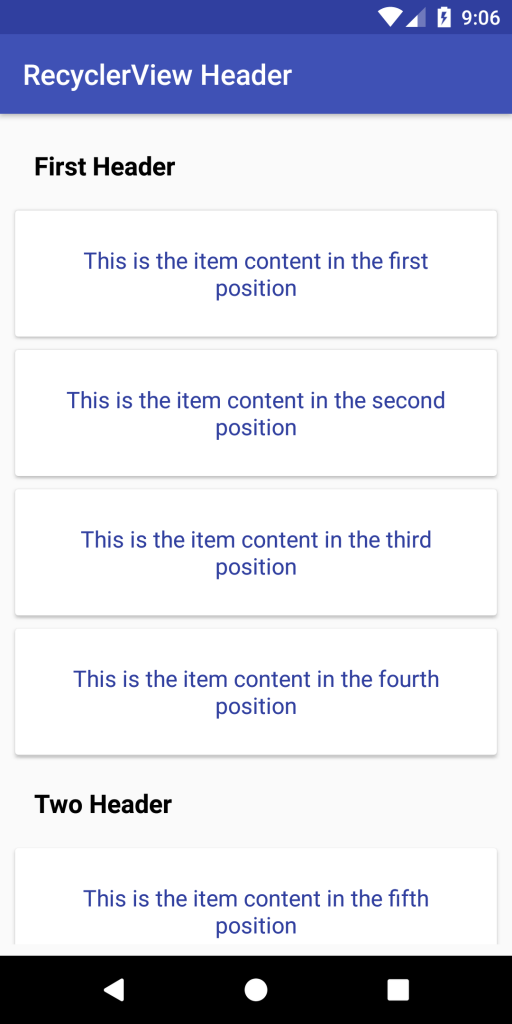
Trong hướng dẫn này, chúng ta sẽ học làm thế nào để thêm header vào recyclerview.
Nếu bạn đã làm việc với Android ListView, chúng ta sẽ nhận thấy rằng có phương thức xây dựng trong phương thức addHeaderView () để bạn có thể dễ dàng sử dụng để thêm tiêu đề vào ListView.
Có thể có vài cách để đạt được điều này nhưng trong bài viết này chúng ta sẽ sử dụng thuộc tính ViewType.
Ngoài ra bạn có thể xem lại bài viết khác về recyclerview trong link sau.
CREATE NEW ANDROID PROJECT
Trong bài viết này mình sử dụng cấu hình sau:
- Android Studio 3.0
- Min SDK 15
- Target SDK 26
CONFIG BUILD.GRADLE
apply plugin: 'com.android.application'

android {
    compileSdkVersion 26
    defaultConfig {
        applicationId "com.recyclerview.header"
        minSdkVersion 15
        targetSdkVersion 26
        versionCode 1
        versionName "1.0"
        testInstrumentationRunner "android.support.test.runner.AndroidJUnitRunner"
    }
    buildTypes {
        release {
            minifyEnabled false
            proguardFiles getDefaultProguardFile('proguard-android.txt'), 'proguard-rules.pro'
        }
    }
}

dependencies {
    implementation fileTree(include: ['*.jar'], dir: 'libs')
    implementation 'com.android.support:appcompat-v7:26.1.0'
    implementation 'com.android.support.constraint:constraint-layout:1.0.2'
    testImplementation 'junit:junit:4.12'
    androidTestImplementation 'com.android.support.test:runner:1.0.1'
    androidTestImplementation 'com.android.support.test.espresso:espresso-core:3.0.1'
    implementation 'com.android.support:recyclerview-v7:26.1.0'
    implementation 'com.android.support:cardview-v7:26.1.0'
    compile 'com.jakewharton:butterknife:8.8.1'
    annotationProcessor 'com.jakewharton:butterknife-compiler:8.8.1'
}
Ở đây mình có sử dụng thêm plugin ButterKnife để BindView các bạn xem ở đây nhé.
Step By Step
Xong phần config chúng ta sẽ tiến hành công việc từng bước một cách dễ hiểu nhất.
Step 1: Tạo layout cho Header và Item
Đầu tiên chúng ta tạo 2 file /.xml cho 2 thành phần trong recyclerview:
header_layout.xml
<?xml version="1.0" encoding="utf-8"?>
<LinearLayout xmlns:android="http://schemas.android.com/apk/res/android"
    android:layout_width="match_parent"
    android:layout_height="wrap_content"
    android:padding="16sp"
    android:orientation="vertical">
    <TextView
        android:id="@+id/header_id"
        android:layout_width="wrap_content"
        android:layout_height="wrap_content"
        android:textSize="18sp"
        android:textStyle="bold"
        android:textColor="@color/colorBlack"
        android:text="@string/app_name"/>
</LinearLayout>
item_layout.xml
<?xml version="1.0" encoding="utf-8"?>
<LinearLayout xmlns:android="http://schemas.android.com/apk/res/android"
    xmlns:card_view="http://schemas.android.com/apk/res-auto"
    android:layout_width="match_parent"
    android:layout_height="wrap_content"
    android:orientation="vertical">
    <android.support.v7.widget.CardView
        android:id="@+id/direction_card_view"
        android:layout_width="match_parent"
        android:layout_height="wrap_content"
        android:layout_marginBottom="2dp"
        card_view:cardElevation="2dp"
        card_view:cardUseCompatPadding="true">
        <TextView
            android:id="@+id/item_content"
            android:layout_width="wrap_content"
            android:layout_height="wrap_content"
            android:padding="24dp"
            android:textColor="@color/colorPrimaryDark"
            android:textSize="16sp"
            android:gravity="center"
            android:text="@string/sample" />
    </android.support.v7.widget.CardView>
</LinearLayout>
Step 2: Tạo ViewHolder cho 2 layout ở trên
HeaderViewHolder.java
public class HeaderViewHolder extends RecyclerView.ViewHolder{
    @BindView(R.id.header_id)
    TextView headerTitle;
    public HeaderViewHolder(View itemView) {
        super(itemView);
        ButterKnife.bind(this,itemView);
    }
}
ItemViewHolder.java
public class ItemViewHolder extends RecyclerView.ViewHolder{
    @BindView(R.id.item_content)
    TextView itemContent;
    public ItemViewHolder(View itemView) {
        super(itemView);
        ButterKnife.bind(this,itemView);
    }
}
Step 3: Tạo Data mẫu để hiển thị
Đầu tiên mình tạo một Object tên ItemObject.java chứa contents.
public class ItemObject {
    private String contents;
    public ItemObject(String contents) {
        this.contents = contents;
    }
    public String getContents() {
        return contents;
    }
}
Step 4: Tạo CustomRecyclerViewAdapter.java từ các file ở trên
public class CustomRecyclerViewAdapter extends RecyclerView.Adapter<RecyclerView.ViewHolder> {
    private static final String TAG = CustomRecyclerViewAdapter.class.getSimpleName();
    private static final int TYPE_HEADER = 0;
    private static final int TYPE_ITEM = 1;
    private List<ItemObject> itemObjects;

    public CustomRecyclerViewAdapter(List<ItemObject> itemObjects) {
        this.itemObjects = itemObjects;
    }

    @Override
    public RecyclerView.ViewHolder onCreateViewHolder(ViewGroup parent, int viewType) {
        if (viewType == TYPE_HEADER) {
            View view = LayoutInflater.from(parent.getContext()).inflate(R.layout.header_layout, parent, false);
            return new HeaderViewHolder(view);
        } else if (viewType == TYPE_ITEM) {
            View view = LayoutInflater.from(parent.getContext()).inflate(R.layout.item_layout, parent, false);
            return new ItemViewHolder(view);
        }
        throw new RuntimeException("No match for " + viewType + ".");
    }

    @Override
    public void onBindViewHolder(RecyclerView.ViewHolder holder, int position) {
        ItemObject mObject = itemObjects.get(position);
        if (holder instanceof HeaderViewHolder) {
            ((HeaderViewHolder) holder).headerTitle.setText(mObject.getContents());
        } else if (holder instanceof ItemViewHolder) {
            ((ItemViewHolder) holder) .itemContent.setText(mObject.getContents());
        }
    }

    @Override
    public int getItemViewType(int position) {
        if (isPositionHeader(position))
            return TYPE_HEADER;
        return TYPE_ITEM;
    }

    private boolean isPositionHeader(int position) {

        return position == 0 || position == 10;
    }

    @Override
    public int getItemCount() {
        return itemObjects.size();
    }
}
Ở adapter này các bạn chỉ cần chú ý đến hàm:
@Override
    public int getItemViewType(int position) {
        if (isPositionHeader(position))
            return TYPE_HEADER;
        return TYPE_ITEM;
    }

    private boolean isPositionHeader(int position) {

        return position == 0 || position == 10;
    }
Ở hàm này mình set header sẽ là vị trí thứ 0 và thứ 10 trong list dữ liệu itemObjects và trả về ViewType tương ứng. Tiến hành hiển thị dữ liệu theo từng loại viewtype.
Step 5: Sử dụng Adapter vừa tạo
Mở MainActivity tạo dữ liệu giả và đổ lên Adapter thôi. Tuỳ thuộc vào cấu trúc dữ liệu mà bạn định nghĩa các hàm trong adapter cho hợp logic.
public class MainActivity extends AppCompatActivity {
    @BindView(R.id.rcv_header)
    RecyclerView addHeaderRecyclerView;
    @Override
    protected void onCreate(Bundle savedInstanceState) {
        super.onCreate(savedInstanceState);
        setContentView(R.layout.activity_main);
        ButterKnife.bind(this);
        LinearLayoutManager linearLayoutManager = new LinearLayoutManager(MainActivity.this);
        addHeaderRecyclerView.setLayoutManager(linearLayoutManager);
        addHeaderRecyclerView.setHasFixedSize(true);
        CustomRecyclerViewAdapter customAdapter = new CustomRecyclerViewAdapter(getDataSource());
        addHeaderRecyclerView.setAdapter(customAdapter);
    }

    private List<ItemObject> getDataSource() {
        List<ItemObject> data = new ArrayList<>();
        data.add(new ItemObject("First Header"));
        data.add(new ItemObject("This is the item content in the first position"));
        data.add(new ItemObject("This is the item content in the second position"));
        data.add(new ItemObject("This is the item content in the third position"));
        data.add(new ItemObject("This is the item content in the fourth position"));
        data.add(new ItemObject("This is the item content in the fifth position"));
        data.add(new ItemObject("This is the item content in the first position"));
        data.add(new ItemObject("This is the item content in the second position"));
        data.add(new ItemObject("This is the item content in the third position"));
        data.add(new ItemObject("This is the item content in the fourth position"));
        data.add(new ItemObject("Two Header"));
        data.add(new ItemObject("This is the item content in the fourth position"));
        data.add(new ItemObject("This is the item content in the fifth position"));
        data.add(new ItemObject("This is the item content in the first position"));
        data.add(new ItemObject("This is the item content in the second position"));
        data.add(new ItemObject("This is the item content in the third position"));
        data.add(new ItemObject("This is the item content in the fourth position"));
        return data;
    }
}
Cuối cùng chạy app để kiểm tra nào 😀
