Hôm nay mình sẽ hướng dẫn cho các bạn cách chi tiết để viết ứng dụng đăng nhập và đăng ký đơn giản sử dụng Retrofit2 kết hợp với PHP.
1.Các bước thực hiện
- Một hosting free, tên miền các thứ, có thể sử dụng
Hostinger để test. - Tạo database
- Viết trang PHP để xác thực, và đăng ký
- Tạo giao diện login, và register
- Xử lý đăng nhập bằng retrofit2
- Tạo Activity nhận kết quả trả về
1.1 Tạo database
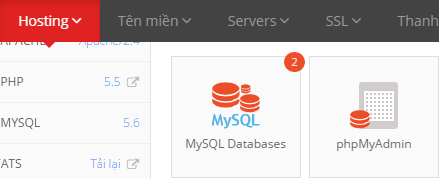
Tại Hostinger tạo database như sau:

Tạo database và truy cập vào phpmyadmin

Tiến hành tạo một table account như sau:
CREATE TABLE `account`(
    `user_id` INT PRIMARY KEY AUTO_INCREMENT,
    `user_name` VARCHAR(50) NOT NULL,
    `password` VARCHAR(50) NOT NULL,
    `email` VARCHAR(100) NOT NULL,
    UNIQUE (user_name)
);
INSERT INTO `account`(`user_name`, `password`, `email`) VALUES ('admin','123456','admin@gmail.com')
1.2 Tạo file PHP để xác thực và đăng ký tài khoản
- File config kết nối:
<?php
	$con = mysqli_connect("HOST","USER","PASS","DB_NAME"); //Kết nối database.
	mysqli_set_charset($con,'utf8');
?>
- File login.php
<?php
	require_once('dbConnect.php');
	mysqli_set_charset($con,'utf8');
	/** Array for JSON response*/
	$response = array();
	if($_SERVER['REQUEST_METHOD']=='POST'){
		$username = $_POST['username'];
		$password = $_POST['password'];
		$sql = "SELECT user_name, email FROM account WHERE user_name = '$username' AND password='$password'";
		if(mysqli_num_rows(@mysqli_query($con,$sql)) > 0){
			    $result= mysqli_query($con,$sql);
                $row = mysqli_fetch_array($result);
				$user_name = $row["user_name"];
				$email = $row["email"];

				$response["success"] = 1;
				$response["message"] = "Đăng nhập thành công";
				$response["user_name"] = $user_name;
				$response["email"] = $email;
		}else{
			$response["success"] = 0;
			$response["message"] = "Đăng nhập thất bại.";
		}
		/**Return json*/
		echo json_encode($response);
	}
?>
- File register.php
<?php
	require_once('dbConnect.php');
	mysqli_set_charset($con,'utf8');
	/** Array for JSON response*/
	$response = array();
	if($_SERVER['REQUEST_METHOD'] == 'POST'){
		$username = $_POST['username'];
		$password = $_POST['password'];
		$email = $_POST['email'];
		$sqlCheck = "SELECT user_name FROM account WHERE user_name = '$username'";
		$result = @mysqli_query($con,$sqlCheck);
		if (mysqli_num_rows($result) != 0) {
				$response["success"] = 0;
				$response["message"] = "Tên đăng nhập đã có người sử dụng!";
			} else {
				$sqlInsert = "INSERT INTO account (user_name,password,email) VALUES ('$username','$password','$email')";
				$resultInsert = @mysqli_query($con,$sqlInsert);
				if ($resultInsert) {
						$sqlGetInfo = "SELECT user_name, email FROM account WHERE user_name = '$username' AND password = '$password'";
						$result = mysqli_query($con,$sqlGetInfo);
						$row = mysqli_fetch_array($result);

						$response["success"] = 1;
						$response["message"] = "Đăng ký thành công!";
						$response["user_name"] = $user_name;
						$response["email"] = $email;
				} else {
					$response["success"] = 0;
					$response["message"] = "Đăng ký thất bại!";
				}
			}
			/**Return json*/
		echo json_encode($response);
	}
?>
Tiến hành upload 3 file này lên hosting.
Giải thích chung cho 2 API :
Method: POST
Tham số:
– username và password với API login.
– username , password, email với API register.
Dữ liệu trả về: dạng String có cấu trúc json.
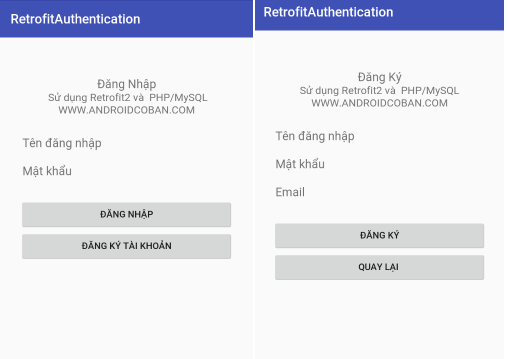
1.3 Tạo giao diện login và register đơn giản:
<?xml version="1.0" encoding="utf-8"?>
<LinearLayout xmlns:android="http://schemas.android.com/apk/res/android"
    android:layout_width="match_parent"
    android:layout_height="match_parent"
    android:orientation="vertical"
    android:padding="10dp">
    <TextView
        android:layout_width="match_parent"
        android:layout_height="wrap_content"
        android:text="Đăng Nhập"
        android:gravity="center"
        android:layout_marginTop="50dp"
        android:textSize="18sp"/>
    <TextView
        android:layout_width="match_parent"
        android:layout_height="wrap_content"
        android:text=" Sử dụng Retrofit2 và  PHP/MySQL"
        android:gravity="center"
        android:textSize="16sp"/>
    <TextView
        android:layout_width="match_parent"
        android:layout_height="wrap_content"
        android:text="WWW.ANDROIDCOBAN.COM"
        android:gravity="center"
        android:textSize="16sp"/>
    <LinearLayout
        android:layout_width="match_parent"
        android:layout_height="wrap_content"
        android:layout_gravity="center"
        android:orientation="vertical"
        android:paddingLeft="20dp"
        android:layout_marginTop="20dp"
        android:paddingRight="20dp">
        <EditText
            android:layout_width="match_parent"
            android:layout_height="wrap_content"
            android:id="@+id/edt_username"
            android:hint="Tên đăng nhập"/>
        <EditText
            android:layout_width="match_parent"
            android:layout_height="wrap_content"
            android:id="@+id/edt_password"
            android:hint="Mật khẩu"/>
        <Button
            android:layout_width="match_parent"
            android:layout_height="wrap_content"
            android:layout_marginTop="20dp"
            android:id="@+id/btn_login"
            android:text="Đăng Nhập"/>
        <Button
            android:layout_width="match_parent"
            android:layout_height="wrap_content"
            android:id="@+id/btn_show_register"
            android:text="Đăng Ký Tài Khoản"/>
    </LinearLayout>

</LinearLayout>
activity_register.java
<?xml version="1.0" encoding="utf-8"?>
<LinearLayout xmlns:android="http://schemas.android.com/apk/res/android"
    android:layout_width="match_parent"
    android:layout_height="match_parent"
    android:orientation="vertical"
    android:padding="10dp">
    <TextView
        android:layout_width="match_parent"
        android:layout_height="wrap_content"
        android:text="Đăng Ký"
        android:gravity="center"
        android:layout_marginTop="50dp"
        android:textSize="18sp"/>
    <TextView
        android:layout_width="match_parent"
        android:layout_height="wrap_content"
        android:text="Sử dụng Retrofit2 và  PHP/MySQL"
        android:gravity="center"
        android:textSize="16sp"/>
    <TextView
        android:layout_width="match_parent"
        android:layout_height="wrap_content"
        android:text="WWW.ANDROIDCOBAN.COM"
        android:gravity="center"
        android:textSize="16sp"/>
    <LinearLayout
        android:layout_width="match_parent"
        android:layout_height="wrap_content"
        android:layout_gravity="center"
        android:orientation="vertical"
        android:paddingLeft="20dp"
        android:layout_marginTop="20dp"
        android:paddingRight="20dp">
        <EditText
            android:layout_width="match_parent"
            android:layout_height="wrap_content"
            android:id="@+id/edt_username"
            android:hint="Tên đăng nhập"/>
        <EditText
            android:layout_width="match_parent"
            android:layout_height="wrap_content"
            android:id="@+id/edt_password"
            android:hint="Mật khẩu"/>
        <EditText
            android:layout_width="match_parent"
            android:layout_height="wrap_content"
            android:id="@+id/edt_email"
            android:hint="Email"/>
        <Button
            android:layout_width="match_parent"
            android:layout_height="wrap_content"
            android:layout_marginTop="20dp"
            android:id="@+id/btn_register"
            android:text="Đăng Ký"/>
        <Button
            android:layout_width="match_parent"
            android:layout_height="wrap_content"
            android:id="@+id/btn_back"
            android:text="Quay lại "/>
    </LinearLayout>

</LinearLayout>
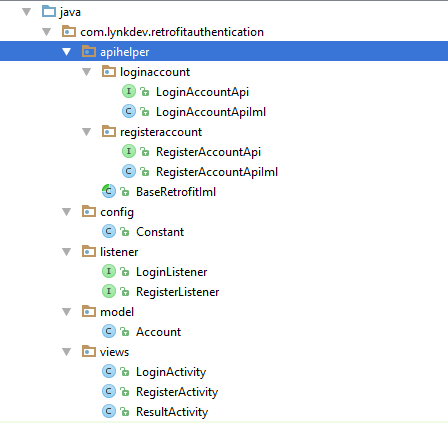
1.4 Tạo cấu trúc project như sau:
1.5 Mở build.gradle thêm các thư viện cần thiết
Cách add và sử dung ButterKnife xem tại đây.
   compile 'com.jakewharton:butterknife:8.4.0'
    apt 'com.jakewharton:butterknife-compiler:8.4.0'
    compile 'com.google.code.gson:gson:2.6.2'
    compile 'com.squareup.retrofit2:converter-gson:2.0.2'
    compile 'com.squareup.retrofit2:retrofit:2.0.2'
1.6 Tạo file model Account.java
public class Account implements Serializable {
    @SerializedName("username")
    private String userName;
    @SerializedName("password")
    private String password;
    @SerializedName("email")
    private String email;
    public Account() {
    }

    public Account(String userName, String password, String email) {
        this.userName = userName;
        this.password = password;
        this.email = email;
    }

    public Account(String userName, String password) {
        this.userName = userName;
        this.password = password;
    }
//Phần getter setter các bạn tự thêm vào giúp mình
}
1.7 Trong thư mục config tạo file Constant.java với nội dung như sau:
public class Constant {
    public static final String URL_BASE = "http://dev.androidcoban.com/blog/";
    public static final String URL_LOGIN = "login.php";
    public static final String URL_REGISTER = "register.php";
}
1.8 Trong thư mục listener tạo 2 file để lắng nghe kết quả trả về:
LoginListener.java
public interface LoginListener {
    void getDataSuccess(Account account);
    void getMessageError(Exception e);
}
RegisterListener.java
public interface RegisterListener {
    void getDataSuccess(Account account);
    void getMessageError(Exception e);
}
1.9 Trong package apihelper tạo 2 package con chứa 2 api login và register như hình ở phía trên:
Tạo lớp BaseRetrofitIml.java để dùng chung cho tất cả các API
public abstract class BaseRetrofitIml {
    private Retrofit retrofit;

    protected Retrofit getRetrofit() {
        if (retrofit == null)
            return new Retrofit.Builder()
                    .baseUrl(Constant.URL_BASE)
                    .addConverterFactory(GsonConverterFactory.create())
                    .build();
        else return retrofit;
    }

}
Tạo interface LoginAccountApi.java
Dữ liệu truyền vào phụ thuộc vào API tùy theo API mà có cách truyền khác nhau, mình không giỏi về web nên viết API đơn giản để sử dụng.
public interface LoginAccountApi {
    @FormUrlEncoded
    @POST(Constant.URL_LOGIN)
    Call<ResponseBody> loginAccount (@Field("username") String username, @Field("password") String password);
}
Tạo file LoginAccountApiIml.java triển khai API ở trên:
public class LoginAccountApiIml extends BaseRetrofitIml {
    String TAG = LoginAccountApiIml.class.getSimpleName();
    LoginAccountApi loginAccountApi;
    Retrofit retrofit = getRetrofit();

    //Xác thực tài khoản
    public void authAccount (String userName, String passWord, final LoginListener listener) {
        loginAccountApi = retrofit.create(LoginAccountApi.class);
        Call<ResponseBody> call = loginAccountApi.loginAccount(userName,passWord);
        call.enqueue(new Callback<ResponseBody>() {
            @Override
            public void onResponse(Call<ResponseBody> call, Response<ResponseBody> response) {
                //Kết quả trả về dạng String nên cần chuyển về dạng Json
                if (response.isSuccessful()) {
                    try {
                        JSONObject jsonObject = new JSONObject(response.body().string());
                        int status = jsonObject.getInt("success");
                        if (status == 1) {
                            Account account = new Account();
                            account.setUserName(jsonObject.getString("user_name"));
                            account.setEmail(jsonObject.getString("email"));
                            listener.getDataSuccess(account);
                        } else {
                            Log.d(TAG, "onResponse: "+jsonObject.toString());
                        }

                    } catch (JSONException e) {
                        e.printStackTrace();
                    } catch (IOException e) {
                        e.printStackTrace();
                    }
                }
            }

            @Override
            public void onFailure(Call<ResponseBody> call, Throwable t) {
                listener.getMessageError(new Exception(t));
            }
        });
    }
}
Vậy là xong phần Login tiếp tục phần xử lý cho Register.
Tạo interface RegisterAccountApi.java 2 api này có cấu trúc giống nhau nên dữ liệu truyền vào giống nhau:
public interface RegisterAccountApi {
    @FormUrlEncoded
    @POST(Constant.URL_REGISTER)
    Call<ResponseBody> registerAccount (@Field("username") String username, @Field("password") String password,@Field("email") String email);
}
Tạo class RegisterAccountApiIml.java triển khai API ở trện:
public class RegisterAccountApiIml extends BaseRetrofitIml {
    String TAG = RegisterAccountApiIml.class.getSimpleName();
    RegisterAccountApi registerAccountApi;
    Retrofit retrofit = getRetrofit();

    //Đăng ký tài khoản
    public void registerAccount(String userName, String passWord, String email, final RegisterListener listener) {
        registerAccountApi = retrofit.create(RegisterAccountApi.class);
        Call<ResponseBody> call = registerAccountApi.registerAccount(userName,passWord,email);
        call.enqueue(new Callback<ResponseBody>() {
            @Override
            public void onResponse(Call<ResponseBody> call, Response<ResponseBody> response) {
                if (response.isSuccessful()) {
                    try {
                        JSONObject jsonObject = new JSONObject(response.body().string());
                        int status = jsonObject.getInt("success");
                        if (status == 1) {
                            Account account = new Account();
                            account.setUserName(jsonObject.getString("user_name"));
                            account.setUserName(jsonObject.getString("email"));
                            listener.getDataSuccess(account);
                        } else {
                            Log.d(TAG, "onResponse: " + jsonObject.toString());
                        }

                    } catch (JSONException e) {
                        e.printStackTrace();
                    } catch (IOException e) {
                        e.printStackTrace();
                    }
                }
            }

            @Override
            public void onFailure(Call<ResponseBody> call, Throwable t) {
                listener.getMessageError(new Exception(t));
            }
        });
    }
}
Vậy là xong phần xử lý.
Quay lại package views.
Trong LoginActvity.java code như sau: Ở đây mình không làm các hàm check giá trị nhập vào:
public class LoginActivity extends AppCompatActivity {

    @BindView(R.id.edt_username)
    EditText edtUsername;
    @BindView(R.id.edt_password)
    EditText edtPassword;
    LoginAccountApiIml accountApiIml;
    @Override
    protected void onCreate(Bundle savedInstanceState) {
        super.onCreate(savedInstanceState);
        setContentView(R.layout.activity_login);
        ButterKnife.bind(this);
        accountApiIml = new LoginAccountApiIml();
    }

    @OnClick({R.id.btn_login, R.id.btn_show_register})
    public void onClick(View view) {
        switch (view.getId()) {
            case R.id.btn_login:
                String userName = edtUsername.getText().toString().trim();
                String passWord = edtPassword.getText().toString().trim();
                accountApiIml.authAccount(userName, passWord, new LoginListener() {
                    @Override
                    public void getDataSuccess(Account account) {
                        // Gửi dữ liệu qua activity result để hiển thị kết quả
                        Bundle bundle = new Bundle();
                        bundle.putSerializable("Account",account);
                        Intent intent = new Intent(LoginActivity.this,ResultActivity.class);
                        intent.putExtras(bundle);
                        startActivity(intent);
                    }

                    @Override
                    public void getMessageError(Exception e) {
                        Toast.makeText(LoginActivity.this, e.toString(), Toast.LENGTH_SHORT).show();
                    }
                });
                break;
            case R.id.btn_show_register:
                Intent intent = new Intent(LoginActivity.this,RegisterActivity.class);
                startActivity(intent);
                break;
        }
    }
}
Ở RegisterActivity.java code như sau:
public class RegisterActivity extends AppCompatActivity {

    @BindView(R.id.edt_username)
    EditText edtUsername;
    @BindView(R.id.edt_password)
    EditText edtPassword;
    @BindView(R.id.edt_email)
    EditText edtEmail;
    RegisterAccountApiIml registerAccountApiIml;
    @Override
    protected void onCreate(Bundle savedInstanceState) {
        super.onCreate(savedInstanceState);
        setContentView(R.layout.activity_register);
        ButterKnife.bind(this);
        registerAccountApiIml = new RegisterAccountApiIml();
    }

    @OnClick({R.id.btn_register, R.id.btn_back})
    public void onClick(View view) {
        switch (view.getId()) {
            case R.id.btn_register:
                String userName = edtUsername.getText().toString().trim();
                String passWord = edtPassword.getText().toString().trim();
                String email = edtEmail.getText().toString().trim();
                registerAccountApiIml.registerAccount(userName, passWord,email, new RegisterListener() {
                    @Override
                    public void getDataSuccess(Account account) {
                        // Gửi dữ liệu qua activity result để hiển thị kết quả
                        Bundle bundle = new Bundle();
                        bundle.putSerializable("Account",account);
                        Intent intent = new Intent(RegisterActivity.this,ResultActivity.class);
                        intent.putExtras(bundle);
                        startActivity(intent);
                    }

                    @Override
                    public void getMessageError(Exception e) {
                        Toast.makeText(RegisterActivity.this, e.toString(), Toast.LENGTH_SHORT).show();
                    }
                });
                break;
            case R.id.btn_back:
                finish();
                break;
        }
    }
}
Cuối cùng một activity để nhận kết quả:
ResultActivity.java
public class ResultActivity extends AppCompatActivity {

    @BindView(R.id.tv_username)
    TextView tvUsername;
    @BindView(R.id.tv_email)
    TextView tvEmail;
    @Override
    protected void onCreate(Bundle savedInstanceState) {
        super.onCreate(savedInstanceState);
        setContentView(R.layout.activity_result);
        ButterKnife.bind(this);
        Account account = (Account) getIntent().getSerializableExtra("Account");
        tvUsername.setText(account.getUserName());
        tvEmail.setText(account.getEmail());
    }
}
actiity_result.xml
<?xml version="1.0" encoding="utf-8"?>
<LinearLayout xmlns:android="http://schemas.android.com/apk/res/android"
    xmlns:tools="http://schemas.android.com/tools"
    android:id="@+id/activity_result"
    android:layout_width="match_parent"
    android:layout_height="match_parent"
    android:orientation="vertical">
    <TextView
        android:layout_width="match_parent"
        android:layout_height="wrap_content"
        android:id="@+id/tv_username"/>
    <TextView
        android:layout_width="match_parent"
        android:layout_height="wrap_content"
        android:id="@+id/tv_email"/>
</LinearLayout>
Tiến hành chạy ứng dụng nhớ thêm permisstion internet 😀
Vậy là cơ bản đã hoàn thành ứng dụng đăng nhập và đăng xuất sử dụng retrofit2 và php, công việc còn lại là tối ưu và check các trường hợp để ứng dụng hoạt động theo mong muốn của mình.
Ở bài viết tiếp theo mình sẽ hướng dẫn các bạn cách sử dụng các API khác như GET, PUT, DELETE, các kiểu tham số khác nhau….
Cám ơn các bạn đã theo dõi bài viết của mình

